Finding a JS bug using chrome developer Tools

Another issue was filed in the cube-roll project, Issue #4 which was a problem with the games score not updating. It turned out to be a small fix but I wanted to go through how I found where in the code the bug was.

I first started the game and duplicated the problem.

I then looked through the code and find what I think gets called when I get a point. I found that line 90 of the world.js file is where the logic for updating the score was.

After finding the area of code where I thought the problem could be, I opened the developers tools in chrome and then I navigated to the sources tab. In the sources tab I navigate to the file I want world.js. I can now setup breakpoints, after that I started the game and duplicated the problem again. This time since I setup the breakpoints the game pause on the breakpoint and I could look at the values of the data in the developer tools.

As you can see in Figure 1 this is what happens when you trigger a breakpoint.

A snippet of the chrome developer tool
Figure 1

After doing the above a few times in multiple areas of the code, I located the line of code with the problem. Inside, hud.js there is the function setText() that is called from line 98 of the world.js file.

Inside setText() I found the below typo:

setText(id, text){
    this.elements[id].test=text; // .test should be .text
    this.redraw=true;
}

Now that I found the problem I was able to fix the typo and submit a PR:

https://github.com/mklan/cube-roll/pull/5

Continue development of chat app.

Development on the chat app has been going good. Few things I would like to get finalized would be a continued integration system, linting, tests and database.

I think travisCI would be a great addition to the repo. Took a class today that explained how to implement travisCi into a GitHub repo. It looks like it will be pretty easy, might add it this week.

To make travisCI really useful it need’s to be doing more then just running the app as the test. It is capable of running linting software like eslint and actually test that could be created for the app.

I would also like to start research on the best options for incorporating a database into the app. I created a discussion thread here, I would like other people’s opinion in making this choice.

Also, for release 3 I found a external project to contribute to on GitHub. It was interesting, it required me to get into a bit of Ruby which was interesting. Here is the PR made for the code-gov-style project.

Maintaining a GitHub Project

Wow I now have a much better understanding of the life of a project maintenance, after this week.

So, a few classmates have now joined the NodeChat Project, the week started simple by me posting a bunch of issues for everyone to work on. But, once they started to work in the project, they started to post their own issue’s. They ran into thing’s that being the one who wrote most of the code, I didn’t really think about.

For example, the readme file I didn’t need it so it was very outdated and simple. So, I needed to update that so people could more easily start working. Also, I added a contributing file which explain’s a few more thing’s. updated docs.

Another example, was the folder structure was outdated, we were working inside a folder while the root contained the original project before I started working on it, so there were a bunch of files kinda not really doing anything. And we also had the server inside the same git repo. Apparently this is very confusing, another thing that I got used to and learned to ignore, which wasn’t good for new contributors joining the project. We have now gotten ride of all the old code and moved the server into it’s own repo. So now the react app is alone it the main repo, which make a lot more sense for new contributors.

Lot’s of change’s happened over this past week on the OTRChat Project. I have now had a taste of what managing a project looks like and I am only working with 4 people, can’t image large project with 100+ contributor’s. As with everything you start small and work toward something big.


Hacktoberfest 2018 – My experience

Hacktoberfest 2018, was a great learning experience for me. I was able to find a great project for this event, that fit my interest’s and ability’s.

Starting this event was a bit challenging, I knew I wanted to work with something with java script. And I also, wanted to work on more front end development. So this helped me narrow down what project to work on, picking a project to work on took some time. After looking through the Hacktoberfest tag on GitHub for a while I came across the Node Chat app that was using node and socket IO to create a chat app. The owner of the project wanted to recreate the test site using react. This peaked my interest, since I was familiar with react, node and socketIO,  so I took on the task of creating this react site for my first pull request for Hacktoberfest 2018.

After my first PR on the Node Chat I asked to continue working on the react app. The owner of the app invited me to be a maintainer for this project. So, for the rest of Hacktoberfest I worked on bugs and features of the react app.

My Hacktoberfest 2018 Pull Requests and Issues

  1. https://github.com/joshghent/NodeChat/issues/11
    https://github.com/joshghent/NodeChat/pull/24
  2. https://github.com/OTRChat/NodeChat/pull/27
  3. https://github.com/OTRChat/NodeChat/pull/28
  4. https://github.com/OTRChat/NodeChat/pull/29
  5. https://github.com/OTRChat/NodeChat/issues/1
    https://github.com/OTRChat/NodeChat/pull/30

Overall, I had a very positive experience in Hacktoberfest 2018. I learned allot about git, especially using branches. I now use branches all the time for whenever I want to test something or work on a issue or feature. And after making 5 PR’s I am much more comfortable with the process.

Now that I know events like Hacktoberfest exist, I am definitely going to keep an eye out for them, in the future.

Hacktoberfest – Added user is typing… feature using React and SocketIO

This blog post covers my 5th pull request of Hacktoberfest 2018!!!! For a few days I wasn’t sure if I would be able to reach the 5 PR goal.  I got super busy with another project, which I may put a blog post up about that project sometime. I was able to work hard on Hacktoberfest the past couple day’s and now I am done all 5 PR’s!!!

Back to the topic of this post I’ll put a summary blog post of Hacktoberfest soon.

I add the feature that show’s when a user is typing which was requested in issue #1 of the node chat project.  Here is the link to the pull request.

In order to accomplish this task I used two events on the server side. ‘typing’ and ‘stop typing’.

Server Code
socket.on('typing', function(){
    socket.broadcast.emit('typing', {
      username: socket.username
    });
  });

  socket.on('stop typing', function(){
    socket.broadcast.emit('stop typing', {
      username: socket.username
    });
  });

For the client code I put the two event listener’s inside the componentDidMount().

The event listener for ‘typing’ add’s the user name to a state variable ‘userIsTyping’ which is an array of the user names that are typing.

The event listener for ‘stop typing’ removes the user name from ‘userIsTyping’.

Client Code
componentDidMount() {
  this.state.socket.on('typing', (user) => {
      if(this.state.username!==user.username){
        if(!this.state.userIsTyping.find(function(users){
              return users==user.username;
           })) {
          this.setState({userIsTyping: [...this.state.userIsTyping, user.username] });
        }
      } 
  });

  this.state.socket.on('stop typing', (user) => {
    if(this.state.username!==user.username){
       this.setState({userIsTyping: this.state.userIsTyping.filter(function(users) {
           returnusers!==user.username;
         })});
       }});
    }
  }
}

The function below is used to retrieve the content of the input field. It will emit ‘typing’ if there is anything inside the input field and it will emit ‘stop typing’ when there is nothing inside the input field.

setChatInput(event) {
  if(event.target.value !== ""){
    this.state.socket.emit('typing', this.state.username);
  } else if(event.target.value === ""){
    this.state.socket.emit('stop typing', this.state.username);
  }
  this.setState({ chatInput:event.target.value });
}

The end result looks like this:

Hacktoberfest – Bug Fixes and Styling in NodeChat app.

For my 3rd and 4th pull request of Hacktoberfest, I didn’t work on much new technology, like in my previous pull request’s. Instead I thought I would fix a bug that was added during the move from a jQuery site to a React site. And I added some styling to the messages on the NodeChat app.

PR #3 

In the original jQuery site the original creator designed it to display a greeting message when a user logs in. From testing the original site, the greeting message only displayed the first time someone logged in. This is were the React app had a bug, it would always display the greeting message when you enter the chat.

In order to fix this bug I needed to have the idea of a previous user inside the chat page component. I was able to do this by creating a Boolean inside the login page and sending that over to the chat page through props. This allowed my to conditionally show the greeting message.


PR #4

Since the chat app can handle more then just 2 people at a time, I wanted to show who is sending each message. I was already receiving the username of the sender so it wasn’t technically that hard to get the username to display. Their was a bug in receiving the username but it was quick to fix.

The more involved part of this PR was probably all the CSS required to make the messages look nice.

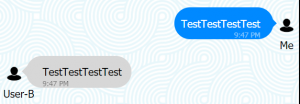
Here’s a picture of the end result:


Hacktoberfest – Adding sound and images to a React app

Hey everyone,

It seems like allot of people like to over complicate adding sound and images in React.  They will often make a whole separate class to control their sound or image files. Which definitely has its place, if your sound or images needs bunch of options then definitely make a class to control it. But if all you want to do is play a sound or add a image to your app, I think its simpler to add it in directly inside the class it relates to.

Note:  I also learned that React doesn’t like when you refer to something by its path inside the code. You have to use a import statement in order to include a file into your react app. In the code below you will see me do this.


Playing Sound in React:

Below is how I figured out how to play sound from my react app in just a few statements.

import mp3_file from './yourFileName.mp3';

playSound(){
   this.Sound.play();
}

<audio src={mp3_file} ref={Sound => { this.Sound = Sound; }}/>
Adding a Image in React:

Below is a simple way of adding a image to your React app.

import myImg from './yourFileName.png';

<img src="{myImg}" />

Hacktoberfest Week Two – React and Push.js

In this week of Hacktoberfest, I added push notifications to the Node Chat project in my most recent Pull request. I used the Push.js library in order to accomplish this task. Well learning how to do this, I din’t find much documentation on using Push.js with React so I put together a small tutorial for today’s blog.

Integrating Push.js with React

Natively, there is currently no solution to use Push.js with React. In order to use Push.js with react you have to use it as an external libraries. Below is how I added Push.js to React as an external library.

First step:

Include the script file in the main “index.html” file for your app.

I used a CDN to do this:

<script type="text/javascript" src="https://cdnjs.cloudflare.com/ajax/libs/push.js/1.0.7/push.min.js"></script>

Second step:

Import Push.js into your file.

Put the following line at the top of the .js file you want to use Push.js in.

import * as Push from "push.js";

After importing Push.js you can now create push notifications inside your react app.

Here’s an example of how to create a notification in a react component.

notify(){
 Push.create("Hello world!", {
     body: "Thanks for reading my Blog!",
     timeout: 5000,
     onClick: function () {
         window.focus();
         this.close();
     }
 });
}